The Google Nest Learning Thermostats are one of the top and most recommended smart thermostats on the market, and we think they deserve it. Their intuitive design and seamless integration into today’s modern smart homes set them apart from many other smart thermostats available. Also, their advanced learning algorithms make heating and cooling systems more efficient and save energy costs. These can be monitored by smart devices using the Nest app. However, in this article, we have reviewed Nest Learning Thermostats for them who want to make their home more energy-efficient or are thinking of building a DIY home automation system.
Why Nest Learning Thermostat?
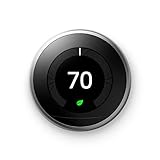
Nest Labs designs minimalistic knob-shaped thermostats that have a rather captivating futuristic look. If you want something tiny and powerful, you will find the Nest’s knob design quite fulfilling. The Nest Learning Thatmostates has all you need to control the room temperature, and the screen lights up when you pass by, letting you know the current temperature and working mode without pushing or touching anything. Thus, go through our Google Nest thermostats review to learn more.
The entire series of Nest Learning Thermostats will save 10-12 percent on heating and up to 15 percent in cooling costs. By learning from you and using this knowledge to program itself, the Nest creates the perfect dynamic thermostat that can work on autopilot or take in remote instructions from your portable devices.
#Top Nest Learning Thermostats

Buying a 3rd generation Nest thermostat would be a great idea, but you might want to go back into the first or second generation catalog to find the best value for your money. However, we will go through from 1st generation to 3rd generation in this article.
#Nest Learning Thermostat – 1st Generation

Key Features
- It’s the original Nest. Beautiful, easy to use, and can be controlled from smart devices.
- Auto-Schedule – It remembers the temperature of your choice and programs accordingly
- Auto-Away – It automatically turns everything off to save energy when you are away.
- Remote Control – Connection Nest Thermostat to your Wi-Fi network, you can control it from your smartphone, tablet, or laptops from anywhere.
- Energy History – It saves energy history and you can check how much energy you have used and which is affecting your energy use the most.
Nest Learning Thermostat 1st generation (t100577) is the beginning of the Nest Learning Thermostats. It’s a blend of simplicity, efficiency, and usability that has become synonymous with nest thermostats. It has all the basic features you would expect in a smart thermostat. The features include auto scheduling, monitoring by smart devices from a remote location, auto-away mode to shuts everything down while you’re away, energy history, and many more. To learn more details about Nest Learning Thermostat 1st generation, click here!
#Nest Learning Thermostat – 2nd Generation

Key Features
- Compatible with Amazon Alexa voice control (sold separately)
- Auto-Away – saves energy by turning everything off automatically when you’re away.
- Design – 20% thinner than the 1st generation and works in 95% of homes with low voltage systems.
- Auto-schedule – it remembers the temperatures you like and programs itself.
- Easy to install – Most of the homeowner reports that they installed Nest within 30 minutes/less by themselves.
- Remote control – connect Nest to your Wi-Fi network to control from your smart devices.
- Work with 95% of low voltage (24V) heating and cooling system as well as with hot water, electric, gas, oil, heat pump, forced air, solar, radiant, and geothermal.
Nest Learning Thermostat 2nd generation is a programmable thermostat that replaces its predecessor – Nest Learning Thermostat 1st generation. It’s a perfect and adorable Nest learning model. This smart thermostat is 20% thinner than its previous model and works with 95% of homes that have low voltage systems. So, it’s compatible with 95% of low voltage heating and cooling systems, including electric, gas, heat pump, hot water, forced air, oil, solar, radiant, and geothermal. By perfecting the learning model, Nest 2nd generation thermostat gives you an edge over its 1st generation modules. Thus, you will get more versatility and better learning without losing the convenient Wi-Fi control or the intuitive knob design with a simple but functional digital display unit. It doesn’t require C-wire for installation. Therefore, it’s certainly a better option for most of the homeowners who aren’t willing to rebuild their HVAC systems to accommodate the Nest.
Read full Nest Learning Thermostat 2nd generation review here!
#Nest Learning Thermostat – 3rd Generation

Key Features
- Compatible with Amazon Alexa voice control (sold separately)
- Auto-Schedule – eliminates confusion about programming. It learns the temperature you like and sets itself.
- Wi-Fi Thermostat – you can connect this Nest Thermostat to your Wi-Fi and can control via your smart devices.
- Energy Saving – A Nest Leaf will appear when you select a temperature that saves energy. It guides you in the right direction.
- Smart Thermostat – In the beginning, Nest will learn how your home warms up and Keeps an eye on the weather to get the temperature you want when you wish for.
- Auto-Away – The Nest will automatically turn off everything to save energy when you are not at home or away.
- Remote Control – You can connect Nest to your Wi-Fi and control remotely from your smartphone, tablets, or PCs.
- Farsight – Nest Thermostat is smart enough to spot you in the room, and then lights up nicely to show you the current temperature, time, or weather.
- Energy Star – It’s an energy star certified smart Wi-Fi thermostat and can control up to half of your energy bill – more than electronics, more than appliances. So, start saving energy with your thermostat.
- Energy History – It can store energy history so you can check how much energy you have used and the reason.
Nest Learning Thermostat 3nd Generation is the top-rated, positively reviewed, and the most recommended smart thermostat on the market. It has over 18,000 reviews on Amazon, and 77% of them are 5/5, which is 150-200 percent higher than any other thermostat available in the market. Altogether, it’s the best and simplest smart Wi-Fi thermostat.
The Nest Learning 3rd Generation is an advanced, powerful, and feature-packed smart thermostat that is ideal for homes willing to upgrade. Also, using this thermostat is easy, and it learns how you like your home. So, you don’t have to spend much time fiddling with your schedule. More precisely, its more aggressive artificial intelligence makes the auto-schedule feature more reliable, which means you don’t have to waste time programming the Nest 3rd generation according to your own needs. The display screen updated to 24-bit color LCD with an impressive 480×480 resolution. It’s also compatible with Amazon Alexa for voice control like Nest Learning Thermostat 2nd Generation that adds something tangible to the formerly impressive control catalog. After all, it has all the features from its earlier tested and proven Nest learning thermostats. So, with a combination of all these features, Google is offering you with a modernized thermostat that will definitely help you to control your utility bills firmly in style. Read full Nest Learning Thermostat 3rd Generation review to learn more!
Maintaining the same design across three generations of digital thermostats, the Nest not only guarantees compatibility but also keeps the learning curve fairly leveled no matter what Nest thermostat you buy.
The three generations of the Nest learning thermostat are eerily similar. They all share a ton of amazing features and looks. As you would expect, things get better with each repetition. Here’s how you can know what nest thermostat you have.
Why People Love the Nest
The Nest’s most notable feature would be the auto-learn feature. Nest Labs has been moving away from the programmable thermostat theory into a more modernized intelligent gadget that learns your behavior and uses sensors to stick its optimizations. It takes a couple of days of subtle fiddling to teach it your detailed conditioning preferences.
The GUI user interface and knob control is quite great. Attach it to the bubble mounting panel, and you will get a thermostat that is as aesthetic as it is functional. If you want to customize your installation further, you have the option to purchase your own mounting panel.
- A detailed compatibility with different types of HVAC systems will help you get the perfect settings for your home. You can choose it during configuration.
- Impressive learning capabilities, even with little or no manual programming making it simple to use for most homeowners. All you have to do is adjust the temperatures to your desired level, and it will pick the trend.
- A handy smartphone and PC application that lets you program your nest thermostat from an ample user interface.
- Tons of pre-installed thermostat settings that pretty match even the refined air conditioning needs.
- The Nest leaf will appear on when you choose an eco-friendly setting, and the history tab will make you feel proud of your investment whenever you save more and more on air conditioning.
How to Install the Nest Thermostat
When choosing a new digital thermostat, most homeowners always think of compatibility and ease of installation. Designers at Nest Labs make nest programmable thermostats as easy as removing old thermostats, installing base plate, connecting wires, and plugin in the new Nest thermostats. They will even provide you with the screwdriver you need to do the installation.
The Nest will work with up to 95 percent of the heating and cooling systems in the market. It doesn’t matter whether you are running a heat pump, forced air system, or gas air conditioning. You can easily replace your existing thermostat with the innovative Nests and you are good to go. Also, this thermostat works with low voltage systems (24V).
Nest Labs has provided a compatibility widget to help you gauge your system’s compatibility before purchasing your thermostat. If your system is compatible and you want to do some DIY installation, a brief Nest thermostat installation guide should teach you the basics within a short time.
➤ Confirming Compatibility
To confirm compatibility, use the Nest compatibility tool that will require your current wiring layout to create a custom wiring diagram. Use the photo you just took to feed the compatibility tool and customize it to fit your system.
Some thermostats may have two sets of labels on each connector of the old thermostat. One of the connectors is for heat pump systems and the other for conventional systems. This quick guide will help you figure out what information will feed into the compatibility tool.
Don’t bother to use the compatibility checker if,
- You use a high voltage system. Systems labeled 240V or 120V are beyond the Nests docket. A common characteristic of high voltage systems is thick gauge wires with wire nut connections.
- Your old system used stranded wires. These are another indicator that your system is a high voltage (line voltage unit).
➤ Nest Thermostat Installation Pro Tips
- Remember to label your wires when disconnecting them from the old thermostat. Use some masking tape or labeling tags and scribble the socket each wire was hooked into on your old thermostat.
- Roll the thermostat wires around a pencil or stick to prevent them from falling into the hole in the wall before you can hook them up to the thermostat.
- Always fit the base plate and ensure its neat and presentable before you begin wiring the Nest thermostat.
- Each terminal on the Nest base takes one wire. Slot in the correct wire to the right terminal. The terminal button will stay down if you have locked the wire in place properly.
➤ Nest Thermostat Installation Manual
The following Nest thermostat installation manual will teach you how to hook up the thermostat to the wall, set it up, add it to your Nest account and start using it all on your own. By this step, you should have confirmed that your existing installation wiring is compatible with your new Nest thermostat. Here is a brief compatibility test guide.
Before starting the installation, take a picture of your current thermostat connection so that you can remember where each wire goes. It’s important since different thermostats and regions use different color codes, making it hard to identify a cable by its color.
Power off your AC at the circuit breaker and give it some time to prove it is off by surveying a steady temperature drop on your thermostat. If your thermostat doesn’t have a battery, it will go off once you turn off the power.
Remove the thermostat cover to expose the wiring and labeled plate before taking the photos. Some thermostats might have a second plate obscuring these. Remove it before taking the photo. Ensure that it is a clear photo, and you can read all the labels and wording.
Letting a Nest Pro to handle the installation process gives you access to a lucrative extended five-year warranty. The guarantee is always worthy compared to the cost of installing the thermostat. However, if you want the satisfaction of a DIY project, here are the steps to follow,
Once the thermostat is in place, you can power up your AC, hence the thermostat, and follow the Configuration Wizard to connect to the home Wi-Fi and the internet. You will nee this connection if you want to use your Nest account to unleash the full potential of your account.
Nest Remote Control
The Wi-Fi control over the Nest App makes this thermostat quite delighting as you can keep an eye at your home from wherever you are. Our Nest thermostat review proves that each thermostat comes Wi-Fi ready. It will latch into your Wi-Fi, and you can immediately control it using your laptop, tablet, or smartphone.
The app lets you change temperatures, edit schedules, and view comprehensive usage reports. You will even get a monthly newsletter with summaries and hints on how to better your energy savings.
With a fully encrypted connection, you needn’t worry about someone hijacking your air conditioning. Just remember to set a strong password and keep it off prying eyes.
Why Pay More for a Second or Third Generation Nest?
While you might argue that the first generation is enough automation to your home, we would give you a couple of reasons why you should get the 3rd generation Nest thermostat – if you can afford it.
- A bigger, brighter screen makes it easier to navigate through the setting or view the settings from a distance. The 3rd generation has a 40% large screen but still maintains the size (20 percent thinner than 1st generation)
- The FarSight detector makes Nest 3 more sensitive to motion. It will light up when you pass up to 20 feet away, meaning that it can auto-learn when you are away better and faster.
If you are not willing to spend an extra 50 or so bucks for a bigger screen or better sensors, you could still make do with the 2nd generation Nest thermostat or even go as low as the 1st generation Nest thermostats – assuming you can still get your hands on one.
Do You Really Need the Nest Account?
Before moving on…
We hope our Nest Learning Thermostats review sheds some light on your search. Buying a smart digital thermostat for the first time might be quite a challenge. There are so many things to look at and compare before you make your final decision. In-depth reviews of each Nest thermostat will come in handy when making these decisions.
Feel free to look at the comparison page that’s dedicated to comparing the different smart thermostats we have in this article. If you are confident that Nest Learning thermostats are the best for you, you can check out the Nest Learning Thermostat 2nd generation or the Nest Learning Thermostat 3rd Generation.
Common Nest Installation FAQ
The Nest account gives you full access to the thermostat through the Nest app as well as a great way to monitor all your Nest products. Although the account is optional and you can still run your nest thermostat without connecting to the nest account, but you will lose control features from anywhere.
You don’t have to register your Nest thermostat to start heating or cooling your house. But connecting to the internet and your Nest account only gives you remote access and all other cool Nest App features. Connect the thermostat to your Wi-Fi. Turn the ring to highlight a letter and press it to select it. You can use shift to toggle through uppercase, lowercase, numbers, and punctuation.
Once connected to the Wi-Fi, you can use your smartphone and the Nest app you downloaded above to finish all the advanced Nest thermostat configurations.
Resetting your thermostat will resolve problems like a slow or frozen display and failure to connect to the Wi-Fi but will wipe out all your settings and what the thermostat learned about your home. A good alternative would be restarting the thermostat.
To reset:
• Press thermostat ring to open Quick View menu
• Click on the settings icon
• Turn the ring to highlight Reset and press the ring to select
• Press and hold down the thermostat ring for 10 seconds, or until the screen goes off. Give it some 20 seconds to ensure it finishes shutting down
• Press and release the ring to initiate the restart process
The best thing to do after replacing your router is to give your Wi-Fi the same SSID (network name) and password as before so that your Nest gadgets can connect automatically. If this isn’t possible or fails to work, you will need to change the settings on the thermostat. You can’t change Wi-Fi information using the mobile app.
• Press thermostat ring to enter the menu
• Select settings
• Turn the ring to select Reset
• Select Network
• Confirm reset. This will reset your network configurations only forcing you to sign in afresh
• Navigate the Settings menu and select Network
• Wait for the thermostat to register the new Wi-Fi network name then select the name and enter the password to that network to connect
Conclusion
Nest and Nest learning thermostats have been around for a while. Their compelling DIY approach and the sheer beauty of the thermostat has made it a delight to many homeowners. It could be a great smart move for your home, especially if you are looking for something that pushes regular updates, has cutting edge learning and wireless control features, and save your energy costs.